Our spine is one of the most vulnerable areas in our body due to its complexity and the support it provides for the whole body. The modern lifestyle contributes to the spinal problems as well – we move less than required to stay healthy. Adopting an exercise routine is an effective, cheap and easy way to relieve back pain and get into the shape.
Here is the program consisting of 7 simple back pain exercises you can do at home; these exercises are suitable for both women and men, and have a special emphasis on low back pain relief. These exercises are based on Pilates system.
Home Exercise Program for Back Pain
1. The first thing to do is to learn how to relax your back muscles. It is needed to make them ready for the load as well as to let the energy flow freely through your back.
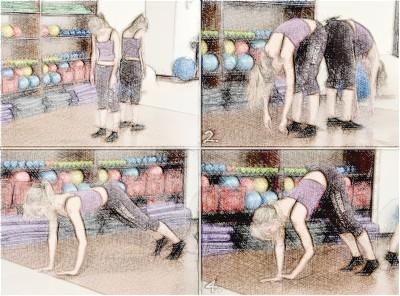 The starting position: stand at 20-30 cm from a wall, with your back facing it; keep the legs at the pelvis width, pull the navel slightly towards the lower back. Start the downward movement with relaxing your neck on exhale. Gradually relax the back, round shoulders and the torso, and lean on the outstretched hands. Do not let your buttocks touch the wall. So you end up on the “four legged pose”, now make a few “steps’ forward with your hands, avoiding rocking the hips to the sides. Your heels, knees, hips, shoulders and head should form a straight line. Avoid sagging of the waist. Turn the look slightly forward on the floor, and hold this posture for 4-6 seconds. Then lift the pelvis up, take the “hand” steps back to the legs, round the back, and gradually return to the starting position.
Note: keep the abdominal muscles strained through the whole exercise.
Benefits: This simple exercise helps to relax the back, correct posture, strengthen the core muscles, and improves the health of the spine. Do the exercise for 4-8 times.
2. Keep the balance, and strengthen the back muscles and thighs
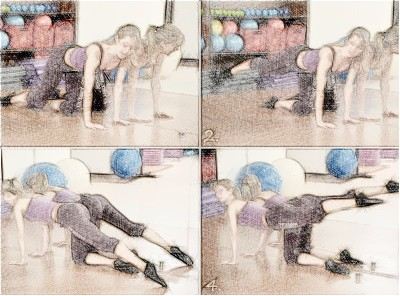 The starting position: standing on the knees against the wall, lean on the hands, bend the elbows slightly, knees are at the pelvis width; pull the stomach in. Slowly start sliding the foot backwards on inhale. Do not touch the wall with the thigh. On exhale, lift the leg from the floor stretching it backwards. Then bring the leg back. Breathe evenly, and don’t drop your head. Avoid sagging of the lower back. Do this exercise slowly, without interruptions, trying to feel how every muscle works.
Do 8-12 times with one leg, relax your back, and do it again with the other leg. This exercise is really good to have in your low back pain home exercise program.
Note: avoid sagging of the low back. While doing the exercise, help yourself mentally – imagine how your spine is stretched in both ways – following the outstretched leg, and at the same time – the head.
Benefits: this exercise improves coordination, strengthens the back muscles and hamstrings, improves blood circulation in the limbs, and increases the ability to concentrate.
3. Relaxing the back muscles
The starting position: sitting on the knees. Round the back, pull the abdominal muscles in, lean forward, placing the arms on the floor in front of you. Stay in this pose for 10-15 seconds, and then return to the starting position. You can do this simple exercise to relieve back pain and tension.
Benefits: this exercise reduces fatigue, relaxes and relieves tension, improves elasticity of all the major muscle groups and helps with headaches.
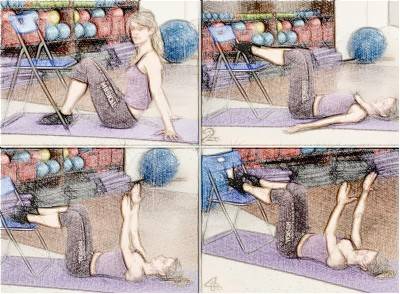
4. Strengthening the lumbar and abdominal muscles
You’ll need a chair of a fit ball for this exercise. The starting position: lying on the floor, knees bent, heels touch the chair (not rest on it), the lower back is not pressing the floor, the shoulders are relaxed and your hands point to the ceiling. Without moving the spine, lift the feet above the chair feeling how the pressure of your heels on the chair reduces gradually and ultimately vanishes. Hold this position as long as you can, then slowly return to the starting pose. Your legs should barely touch the chair. You can imagine that the chair is so fragile that you are afraid of ruining it. Therefore you cannot “throw” your heel on the chair, just touch it gently. Do 8-12 repetitions.
Note: You can have your arms along the body instead of pointing them to the ceiling. Do not let your spine to arch in the lumbar or the thoracic area.
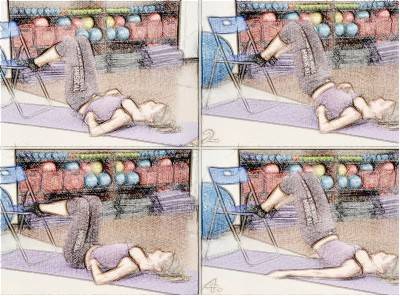
5. Shoulder Bridge – strengthens buttocks and develops flexibility of the spine
The starting position: lying on the floor, knees bent, foot / heel standing on a chair, arms lie at the sides, palms down. Lift the tail bone on inhale, then on exhale lift the hips as much as possible, rounding your back. Your torso is resting on your shoulder blades. Breathe evenly. Your head should not slide on the floor. Return to the starting position slowly, lowering the vertebra by vertebra, firstly thoracic area, then the lumbar, and the tail bone at the end – it touches the floor last. Do it 8-12 times.
Benefits: if done regularly, this exercise improves the condition of the spine and increases the joints flexibility. It also helps to burn some fat in the hips.
6. Don’t forget about posture and slender legs
The starting position: lying on the right side; right arm, torso and legs are on one line; the waist is not pressing into the floor. Keep the left arm on the waist on in front of you – for balance. Gently lift your left leg up, not too high, pull the toes away. Then lower the leg without relaxing it in the starting position.
Do it 8-12 times, then turn on your left side and repeat the exercise with the right foot.
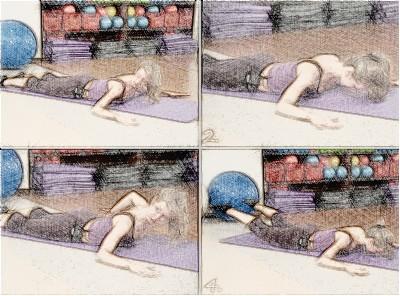
7. Making the elastic muscular system
The starting position: lying on the stomach, feet are at the pelvis width, elbows on the line of the shoulders, palms rest on the floor, head is down, eyes looking at the floor; try to pull your navel up off the floor. Slowly raise your head, pushing your nape towards the ceiling; your upper back follows your head rising above the floor. Feel the tension in the upper back, imagine that you are stretching upward following your head, and then return to the starting position. Keep the abdominal muscles always strained – they will limit the range of motion, saving you from the lower back overload.
Do the exercise 8-10 times.
Note: If you feel your back is strong enough you can raise your legs as well when you lower your chest and the upper back, but do not relax the abdominal muscles. Gel rising is accomplished by the contraction of the buttocks, and not the lower back muscles! Doing this exercise you can imagine your body as a boat floating on the waves.


